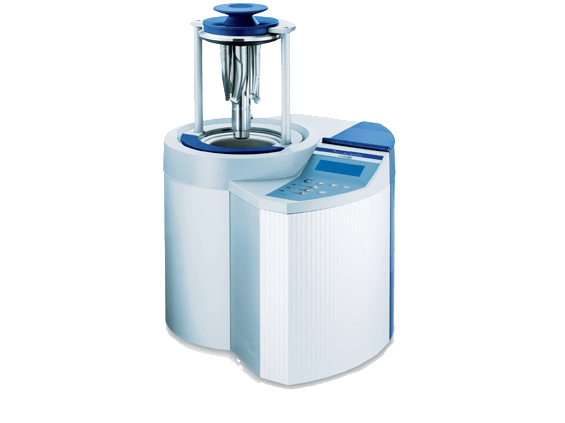
Comply with infection control standards at the touch of a button and avoid cross contamination: Completely safe with DAC Universal. Your patients and employees can rely on this all-round protection and put their complete trust in the treatment with reprocessed and thermally disinfected instruments.
Hygiene at the touch of a button
The touch of a button is all that is required for the lid to close and for DAC Universal to begin its fully automatic decontamination program. Your instruments are then cleaned, lubricated and disinfected*. This is how easy it is to eliminate potential handling errors and obtain perfectly clean results.
*no sterilisation
New design, touch display with intuitive user interface, guided maintenance workflow Check & Clean. Process safety through automatic program selection. LAN interface for electronical documentation.
Low operating and consumption costs – no use of cleaning and disinfection chemicals and chemoindicators. Low investment costs in instruments thanks to cooling at the end of the process and therefore quick return to service.
Six instruments in approx. 15 minutes: Internal and external cleaning, lubrication (if needed) and disinfection* of straight and contra-angle handpieces, turbines, ultrasonic handpieces and tips, nozzles of multifunctional syringes and powder jet devices as well as powder jet handpieces.
Legal certainty
Cleaning and disinfection process which can be validated. Cleaning and disinfection process in accordance with EN ISO 15883-1/-2.
Recommissioning your decon room post COVID-19
Check & Clean the DAC Universal
DAC Universal Troubleshooting Error 70
DAC Universal Troubleshooting Error 71
DAC Universal Troubleshooting Error 81
DAC Universal Troubleshooting Error 84
DAC Universal Troubleshooting Error 86
DAC Universal Troubleshooting Error 90
DAC Universal Troubleshooting Error 91
DAC Universal Troubleshooting Error 92
Detailed below is a list of errors which may appear on your unit’s display. Click on an error to see the possible cause and what action should be taken.
If the DAC UNIVERSAL displays an error, you cannot be sure that a complete cycle has been carried out and therefore the instruments are not sterile – so you must start a complete new cycle.
If an error occurs during sterilisation, the display will, when the lid opens, show that an error has occurred during sterilisation. In order to clear this error and start a new complete cycle - you need to press the “M”-button together with the “C”-button (This will also be indicated in the display)
If the error light is flashing without giving an alarm signal, it is because the machine has reached 3000 cycles or it has been 24 months since the last service. Contact our service team in order to do a biennial service on the DAC UNIVERSAL autoclave. Meanwhile the machine can still be used if only the error light is flashing and no other error codes are visual in the display.
In case of an error, an alarm will sound and the error will be displayed visually.
Please note the error code before resetting the alarm. Pressing C resets the alarm.
When pressing C the lid will open for approx. 2 seconds raise and then stop, until the temperature is below 104â°C/219.2â°F, following which it will open completely.
Do not open if the temperature is more than 104â°C/219.2â°F (â°C indicated in the display), hot steam may come out of the chamber.
If you do not find the error below or the action you take does not solve the problem, please contact our support team on 08700 10 20 46. In order to help you, have the serial number of your unit and a detailed description of the error ready.
Action
Wipe up possible spilled water after filling.
If there is still a leakage, please call our service team on 0800 028 4749.
Note: If the water is filled into the tank too abruptly or the tank is overfilled, the water may leak onto the table.
Action
Clean or change the filter.
Check that the drain tube is not blocked or broken.
Empty the drain tank if full.
Action
If the instruments are to be stored for a longer period (e.g. during the weekend), it is important that they are blown through (horizontal) manually with compressed air in order to remove condensation in the instruments - as condensation can cause corrosion in the instruments.
Note: Be sure to use compressed air at pressure-level (bar) in accordance with the user manual/instructions from the manufacturer of the instruments.
After the instruments have been blown through they must be wrapped.
Action
Tighten the adapter with the enclosed Allen key.
Action
If liquids other than demineralised or distilled water has been filled into the water tank, then the DAC UNIVERSAL must not be used.
Call our service team on 0800 028 4749.
Action
Your DAC Universal engineer has been running a special-programme.
Very Important: Disconnect the power-cable of the DAC Universal and connect it again. If this is not done sterilisation phase will NOT take place!
On a daily basis, with each cycle run, a class 5 integrator needs to be put in the clip provided to ensure that the DAC reaches the correct temperature and sterilises successfully. The code for these tests is IMS-1241.
This should be used once every 50 cycles or once weekly. The Nitraclean tablet will degrease the internals of the DAC and help maintain its effectiveness.
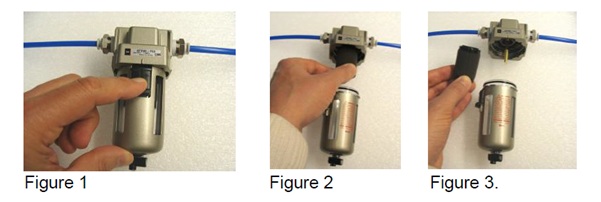
The oil filter should be removed weekly and rinsed under running water. This should then be changed for a new filter once a month.
The unit requires a service every 3000 cycles or Bi-annually. The DAC will inform you when a maintenance call is due.
HTM requires all decontamination equipment to be validated on an annual basis.
After every 50 runs the DAC Universal will, for 2 seconds, give an acoustic alarm and the display will show the following information: “Remember Check & Clean – Press safety ring” - this to remind the user of the need to clean and maintain the unit.
Below please find the detailed service/maintenance schedule for the DAC UNIVERSAL.
In the table it is indicated how often cleaning/maintenance should be carried out.
If you follow the schedule below, you will ensure optimal maintenance and performance of your DAC UNIVERSAL.
|
Task |
Frequency* |
||||
|
|
Weekly |
Every month |
Every quarter |
Once a year |
Every second year in connection with the biennial service or after 3000 cycles |
|
X |
||||
|
2. Clean the drain filter |
X |
||||
|
3. Clean the adapter lid |
X |
||||
|
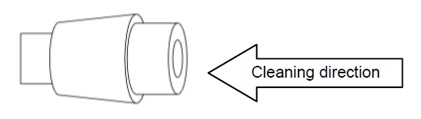
4. Clean the adapters & adapter O-rings |
X |
||||
|
5. Clean the machine externally |
X |
||||
|
6. Clean the chamber |
X |
||||
|
7. Check for oil entering the chamber |
X |
||||
|
8. Check for water entering the chamber |
X |
||||
|
9. Check the safety ring |
X |
||||
|
10. Drain the water tank |
X |
||||
|
11. Change the drain-filter |
X |
||||
|
12. Clean the water tank |
X |
||||
|
13. Change the O-rings on the adapters |
X |
||||
|
14. Change the filter in the Sterile-filter (IF a Sterile-filter is installed on the air-tube) |
X |
||||
|
15. Change the O-ring on the filter housing |
X |
||||
|
16. Change the O-rings on the bottom adapter (in chamber) |
X |
||||
|
17. Change the O-rings at each guiding tube in the lid |
X |
||||
|
18. Change the gasket on the lid |
X |
||||
|
19. Change the O-rings in the valves |
X |
||||
|
20. Change the gasket in the valves |
X |
||||
|
21. Change the gasket under each adapter |
X |
||||
* The above frequency is based on approximately 10 complete cycles per day. If you use your DAC UNIVERSAL more often than this, adjust your service frequency accordingly.
Only authorised engineers may perform the steps 16 to 21 in connection with biennial service.
Follow universal precautions as well as any applicable waste disposal regulations when handling drain tank contents. Please make sure to wear surgical gloves during this procedure.
It is recommended that you empty and clean the drain tank on a weekly basis.
To empty the drain tank, discard the content of the tank according to your local or national guidelines and/or regulations.

The DAC UNIVERSAL should be turned off and cooled down before cleaning the drain filter. Please make sure to wear surgical gloves during this procedure.
The filter must be replaced with a new filter every 4 weeks, based on approximately 10 cycles per day
The adapter lid must not be cleaned with a product containing chlorine.
If any of the O-rings on the adapters are damaged or missing, see point 13 below.
The chamber must not be cleaned with a product containing chlorine.
Remove the adapter lid from the DAC UNIVERSAL lid holder, so that view into the chamber is unobstructed.
Oil is led through the tubes in the following way:
If this number is 60 or above, or if no oil enters the chamber at all, please call our service team on 0800 028 4749.
The oil indication disappears automatically from the display after a few moments.
Procedure A
Water is led through the tubes in the following way:
or
Procedure B
Water should flow into the chamber through four small holes in the bottom of the chamber. Press Clear to stop the water pump.
It is very important to see the water enter the chamber, if there is no water, the instruments are not washed. Call our service team on 0800 028 4749, if water does not enter the chamber.
If an automatic ‟external‟ water supply is installed - remember to CLOSE this water supply – before performing one of the following procedures.
Procedure A
If an automatic ’external’ water supply is installed - remember to OPEN this water supply again.
If an automatic ‟external‟ water supply is NOT installed – manually fill the water tank with demineralised or distilled water.
Or
Procedure B
No need to disconnect the water tube from the water supply.
If an automatic ‟external‟ water supply is NOT installed – manually fill the water tank with demineralised or distilled water.
The DAC UNIVERSAL should be turned off and be cold before changing the filter. Please make sure to wear surgical gloves during this procedure.
If the o-rings on the adapters are not placed correctly, this might damage the instruments or the o-rings and compromise the sterilisation.
If you have an adapter for Yoshida Turbine (order number 63 23 831), a service technician must maintain this adapter at the biennial service.
The DAC UNIVERSAL should be turned off and be cold before changing the o-ring. Please make sure to wear surgical gloves during this procedure.
We know an unexpected breakdown in your practice can be a massive headache for you and your patients - which is why we have a dedicated team of 50 people ready to provide you with a range of comprehensive cover options for your practice equipment, giving you complete peace of mind and minimising the cost of an unexpected breakdown. You can depend on us.
With Protection Cover, you get free access to our team of 10 high tech digital support specialists who can help with digital imaging, lasers and CAD/CAM. For the simpler problems, we also have technicians, who are dedicated to helping you over the phone. You can also at a small cost, use their services even if you don't have cover.
Invest in your practice - choose our comprehensive protection cover. For 12 months we will cover the items you want. It includes an annual service, emergency breakdown, labour and access to our high tech digital support specialists.
To get optimum performance from your equipment and to conform to manufacturer’s recommendations, an annual service could be just what you’re looking for. It’s carried out by our accredited team and includes a 3 month warranty on the work.
We are never far away in an emergency. Unplanned breakdowns are a headache for any surgery. We are more than happy to help.
Our equipment team will use the information you provide to respond to your query as promptly as possible.
You could ask about a FREE one-to-one consultation with one of our specialist team, quotation, demonstration of the latest equipment, or any other question you may have in helping you make an informed decision.