Carestream 7600 Phosphor Plate
CS 7600 provides the essential elements you need to generate outstanding images.
Read more Enquire nowCS 7600 provides the essential elements you need to generate outstanding images.
Read more Enquire nowView Our digital imaging guide
With its fully automated and secured x-ray workflow, the CS 7600 provides the essential elements you need to generate outstanding images. Featuring Scan & Go technology, the unit is designed for shared use, so it’s always available when you need it—making it perfect for multi-user practices. And, since the CS 7600’s plates are as easy to use as film, the system integrates easily into any practice.
Featuring Scan & Go technology, the CS 7600 offers a fully automated and secured workflow that’s designed for shared use and already ready.
No need to reserve the system when scanning a plate
Unit identifies plates prior to exams and automatically routes images to the proper computer and patient file
Scan plates in any order with minimal user intervention and no risk of plate mix-ups
The CS 7600 is designed to reduce errors and help you work more efficiently than ever.
Unit automatically detects if a plate is inserted upside down—without erasing the image
Templates automate routine FMS examinations to reduce user intervention and contamination risk
Built-in color monitor provides clear instructions and messages, delivering instant feedback on the success of each exam
The CS 7600 requires minimal training and its film-like workflow puts all the features of digital technology right at your fingertips.
Plates available in the same sizes as film (0 to 4)
Thin, cable-free plates promote patient comfort and are as easy to position as film
Integrates with your current digital sensors for maximum benefits
Because the CS 7600 can be used chairside or shared between multiple examination rooms, the system is a versatile and cost-effective solution for multi-user practices.
Small footprint fits practically anywhere
Ethernet connectivity allows unit to be easily shared across the network
No dedicated computer required for sharing
With its powerful image processing tools and user-friendly interface, Carestream Dental’s imaging software makes image review quick and easy.
Use alone or integrate with practice management software
Easily adjust contrast and other settings to obtain the perfect image
Simplifies the sharing process
With its many benefits, the CS 7600 truly is a practical solution for any practice.
Scanner can be shared between multiple operatories
Easy to install and use
Durable, scratch-resistant plates can be reused hundreds of times
Eliminates film and processing expenses

The CS 7600 delivers high-quality intraoral images quickly and easily.
Access first image in as little as five seconds
Scan and display a full mouth series (FMS) in just a few minutes
New processing ensures optimal contrast, sharpness, and low noise images
Plates’ wide exposure range helps prevent over- or under- exposure
With the unit’s built-in memory, there’s virtually no risk of image loss.
Continue scanning even when computer is turned off or network fails
Improve efficiency and user experience
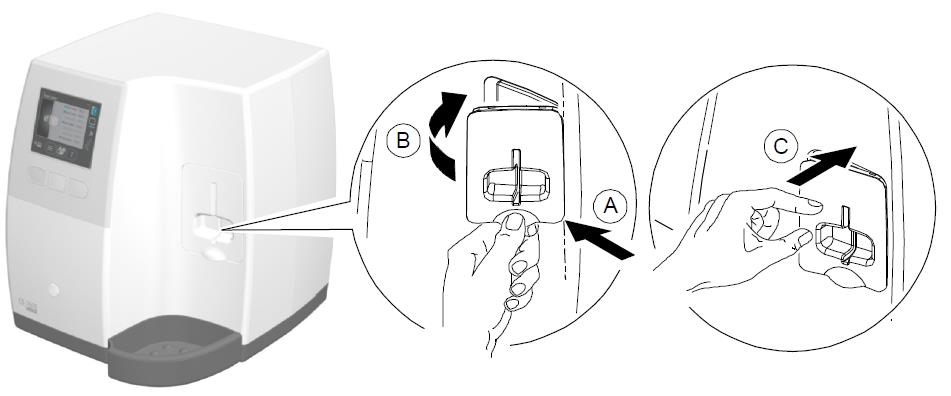
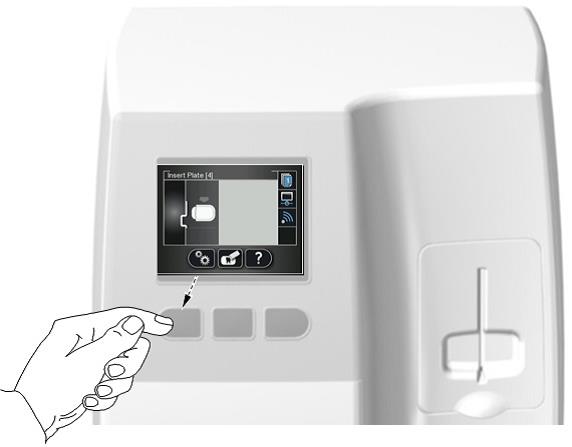
How to replace the CS 7600 scanner insertion panels
Carestream Dental's CS 7600
 or
or .jpg) on scanner display
on scanner display
And/or
 in the image acquisition interface
Possible Cause
Limited or no connection to scanner (physical connection is intact, but the IP address is not correct).
Action
 Image appears.
Possible Cause
No connection to scanner after launching image acquisition interface.
Action
Possible Cause
Scanner memory full.
Action
Clear scanner memory.
Clearing the Scanner Memory
The scanner’s storage capacity is 25 images. Images are stored in the scanner’s memory in the following cases:
• When No ID is selected in the scanner’s Select patient screen (See “Retrieving No ID Images” on page 36 of the CS 7600 User Manual).
• When the destination workstation is not available due to network problems and so forth.
When the scanner’s memory nears its limit, the scan number icon changes to red.
To clear the scanner’s memory, follow these steps:
1. Start the CS 7600 image Acquisition interface.
2. Open the exam acquisition to which the images belong, or alternatively create a new temporary exam acquisition in which you will save these images.
3. Select the scanner; it is indicated by the following full memory/error state icon:

4. In the Scanner List, select the desired scanner and click  the small arrow. The list of No ID images for this scanner is displayed.
5. In the scanner memory panel select the image you wish to clear, and drag to the desired frame in the images area template or delete by dropping to the Images Gallery.
6. To delete all the images in the Images Gallery, click 

7. To confirm, click YES. All the images are removed from the Images Gallery. The scanner icon becomes highlighted green indicating that the scanner is ready for use.

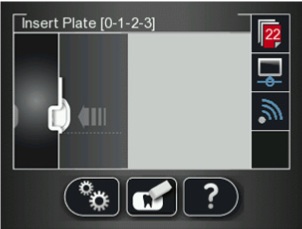
Possible Cause
Imaging plate loading failure.
Action
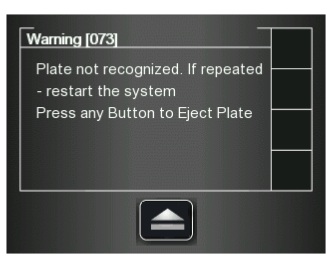
Possible Cause
Imaging plate inserted incorrectly.
Action
Important: Do not insert any tools into the scanner. If any tool is inserted into the scanner the warranties are null and void.
To retrieve a fallen imaging plate, follow these steps:

Important: If the plate is not in the location shown in the above picture, do not continue to look for the plate, call our service team on 0800 028 4749.
Possible Cause
Either imaging plate inserted incorrectly or the imaging plate hygienic sheath is inserted in the wrong direction.
Action
Possible Cause
The scanned image was routed to the scanner’s memory.
Action
Use the image Acquisition interface to check the selected scanner’s unclaimed images and retrieve the required images.
Possible Cause
Incompatible insertion panel size.
Action
Check if the insertion panel size is compatible to the imaging plate size.
Possible Cause
Scanner rollers have accumulated grime.
Action
Clean the scanner rollers.
Note: Before you perform this procedure, make sure you have the rollers cleaning plate.
The scanner rollers should be cleaned in the following cases:
• When the scanner prompts to clean the rollers (after every 1000 cycles).
• When there are dirt-related artifacts on the scanned image.
To clean the scanner rollers, follow these steps:
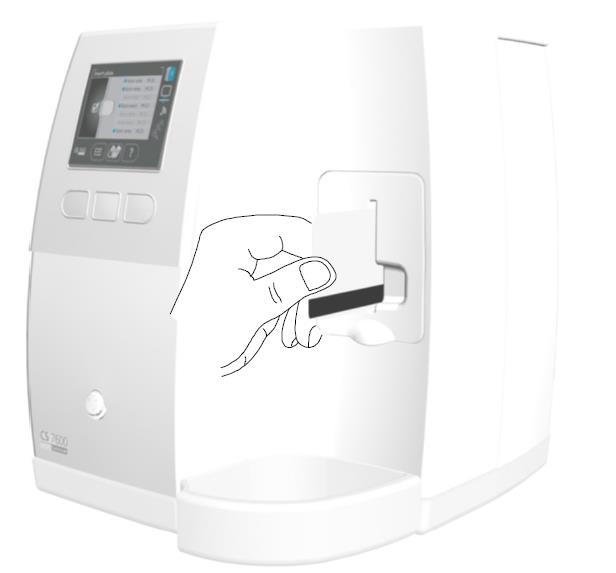
Note: Cleaning the rollers requires using the size 4 insertion slot.
1. If the size 4 insertion slot is not installed, replace the insertion slot with the size 4 insertion slot. (See page 64 of the CS 7600 User Manual).
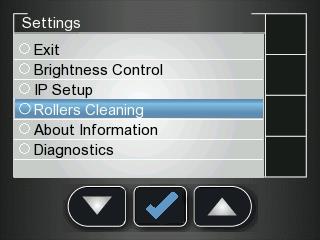
2. Press the scanner’s left function button to access the Settings menu.
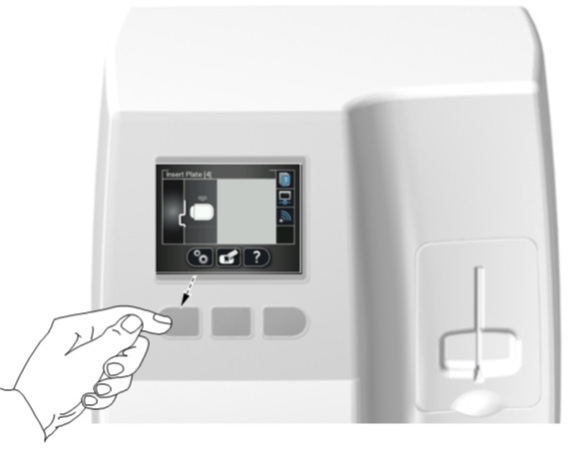
3. Select Rollers Cleaning.
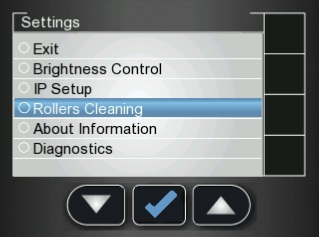
4. Press  the middle function button to confirm the Rollers Cleaning message. The Rollers Cleaning screen appears.
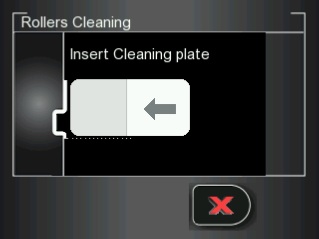
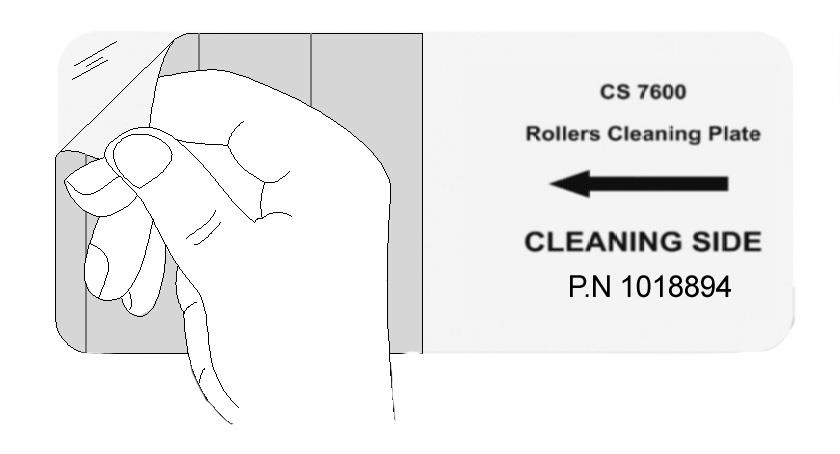
5. Peel the adhesive protective sheet from the rollers cleaning plate.

 Symbol appears in the image acquisition interface display
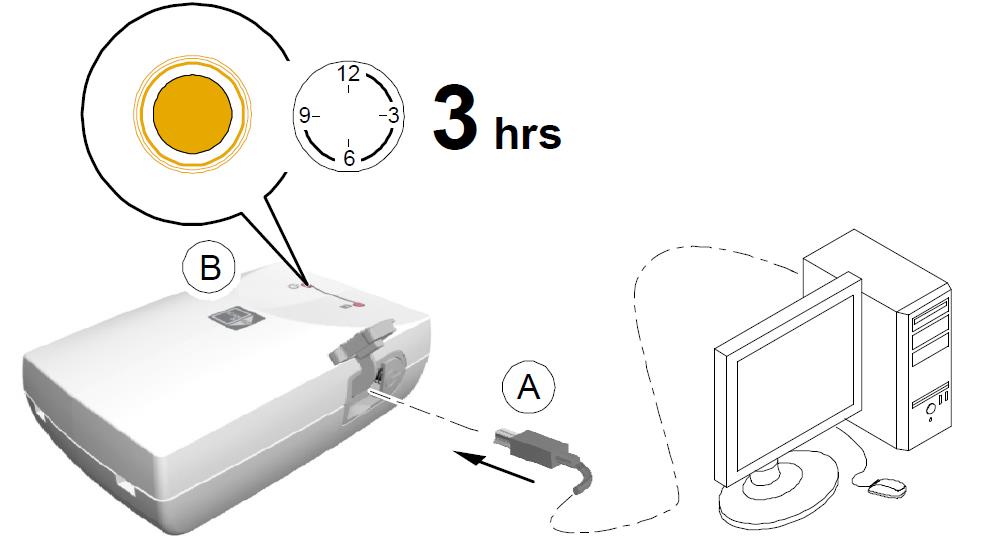
Possible Cause
No USB connection to Scan & Go device.
 Action
If used with care, imaging plates can be used indefinitely until physically damaged. However, the imaging plates will show wear over time due to continuous use. Inspect the imaging plates regularly and replace them if they are scratched and/or show signs of excessive wear.
To prevent damage to the imaging plates and the possibility of image artifacts, avoid contact between the imaging plates and the following materials/solutions/solvents: Isopropyl alcohol, hydrogen peroxide and other peroxides, citrus-based cleaners, hand lotions and water-less hand sanitizers, as well as surfactants and lubricants.
Handling and Storage of Imaging Plates
Cleaning the Imaging Plate
Clean the imaging plate to remove dirt, dust particles, finger prints and so forth that could affect image quality.
Cleaning Materials
• Clean, dry non-abrasive, lint-free wipes or cloths
• Screen Cleaner (Ask your Henry Schein Dental Equipment Specialist for more information)
Cleaning Method
To clean the imaging plates, follow these steps:
Do not soak the hygienic sheath in any cleaning or disinfecting solutions. Do not autoclave; autoclaved hygienic sheaths must be discarded.
Frequency of Disinfection
The hygienic sheath is the primary means of infection control and protection from contaminated imaging plates.
Disinfect the imaging plate after every use (after the image plate is scanned), before it is inserted in the hygenic sheath for the next use.
Disinfection Solutions
To disinfect, use either a self-prepared solution, or a commercially prepared product that adheres to the following specifications and restrictions:
Disinfection Method
If a commercially prepared equivalent solution of diluted bleach is used, follow the manufacturer’s specifications and warnings.
To disinfect the hygienic sheaths and imaging plates, follow these steps:
The imaging plate contains Barium and should be considered hazardous or special waste in specific conditions at the end of its useful service life. For disposal or recycling information, contact your local authorities.
Cleaning the Scanner Body
Use disinfection wipes for medical equipment to clean the scanner body thoroughly from all sides, including the tray.
It is the user’s responsibility to disinfect the imaging plates tray daily to prevent cross contamination
Cleaning the Detachable Insertion Panels
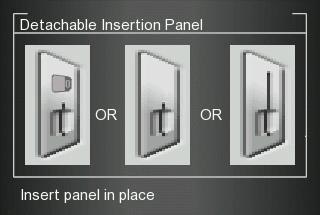
The CS 7600 makes use of three insertion panel sizes according to the inserted plates size (0, 0–3, and 4). The maintenance procedure is identical for both insertion panels.
It is the user’s responsibility to disinfect the detachable insertion panel(s) daily to prevent cross contamination
Do not autoclave; autoclaved detachable insertion panel(s) must be discarded
To clean and disinfect the insertion panels, follow these steps:

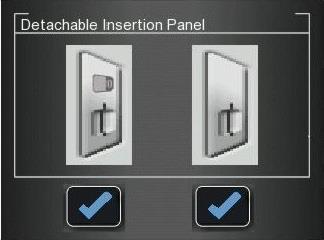
 the left function button to confirm and return to the main screen.
 the right function button to confirm and return to the main screen.
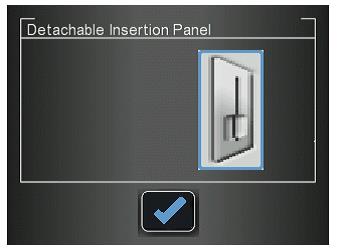
the middle function button to confirm and return to the main screen.Before you perform this procedure, make sure you have the rollers cleaning plate.
The scanner rollers should be cleaned in the following cases:
To clean the scanner rollers, follow these steps:
Cleaning the rollers requires using the size 4 insertion slot
the middle function button to confirm the Rollers Cleaning message. The Rollers Cleaning screen appears.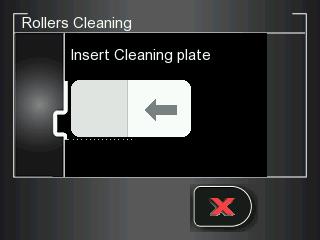
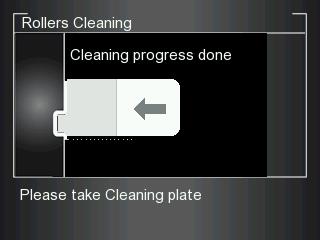
Tip: The cleaning procedure is to be repeated 3 times to ensure the rollers are thoroughly cleaned.
Cleaning the Scan & Go
Use disinfection wipes for medical equipment to clean the Scan & Go device thoroughly from all sides.
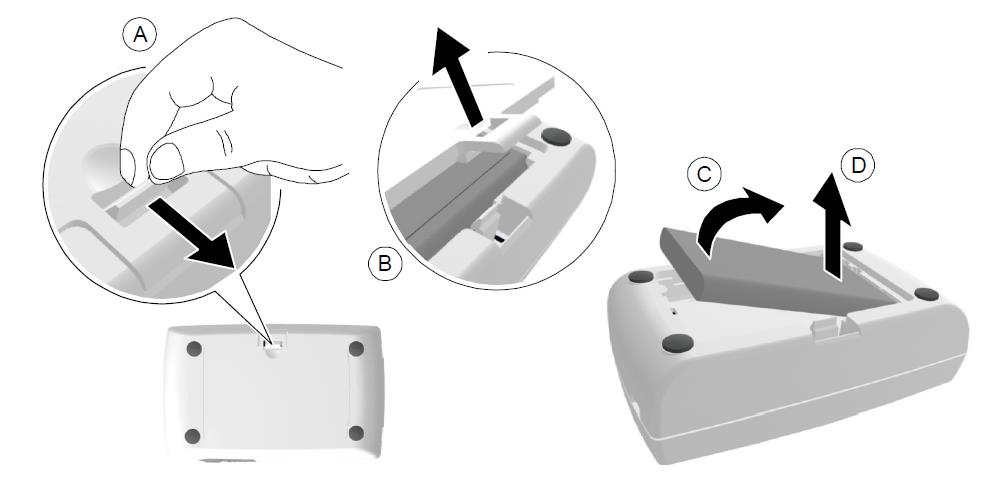
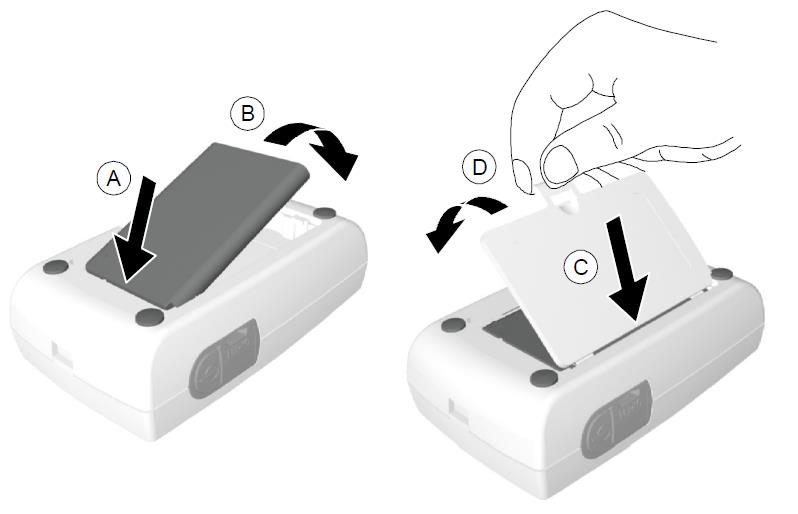
Replacing the Battery (Scan & Go Generation 1)
For Scan & Go Generation 1 models released before June 2012.
Scan & Go devices after June 2012 do not have a battery.
Replace only with a Carestream genuine BL-5C battery
To replace the Scan & Go battery, follow these steps:
We know an unexpected breakdown in your practice can be a massive headache for you and your patients - which is why we have a dedicated team of 50 people ready to provide you with a range of comprehensive cover options for your practice equipment, giving you complete peace of mind and minimising the cost of an unexpected breakdown. You can depend on us.
With Protection Cover, you get free access to our team of 10 high tech digital support specialists who can help with digital imaging, lasers and CAD/CAM. For the simpler problems, we also have technicians, who are dedicated to helping you over the phone. You can also at a small cost, use their services even if you don't have cover.
Invest in your practice - choose our comprehensive protection cover. For 12 months we will cover the items you want. It includes an annual service, emergency breakdown, labour and access to our high tech digital support specialists.
To get optimum performance from your equipment and to conform to manufacturer’s recommendations, an annual service could be just what you’re looking for. It’s carried out by our accredited team and includes a 3 month warranty on the work.
We are never far away in an emergency. Unplanned breakdowns are a headache for any surgery. We are more than happy to help.
Our equipment team will use the information you provide to respond to your query as promptly as possible.
You could ask about a FREE one-to-one consultation with one of our specialist team, quotation, demonstration of the latest equipment, or any other question you may have in helping you make an informed decision.