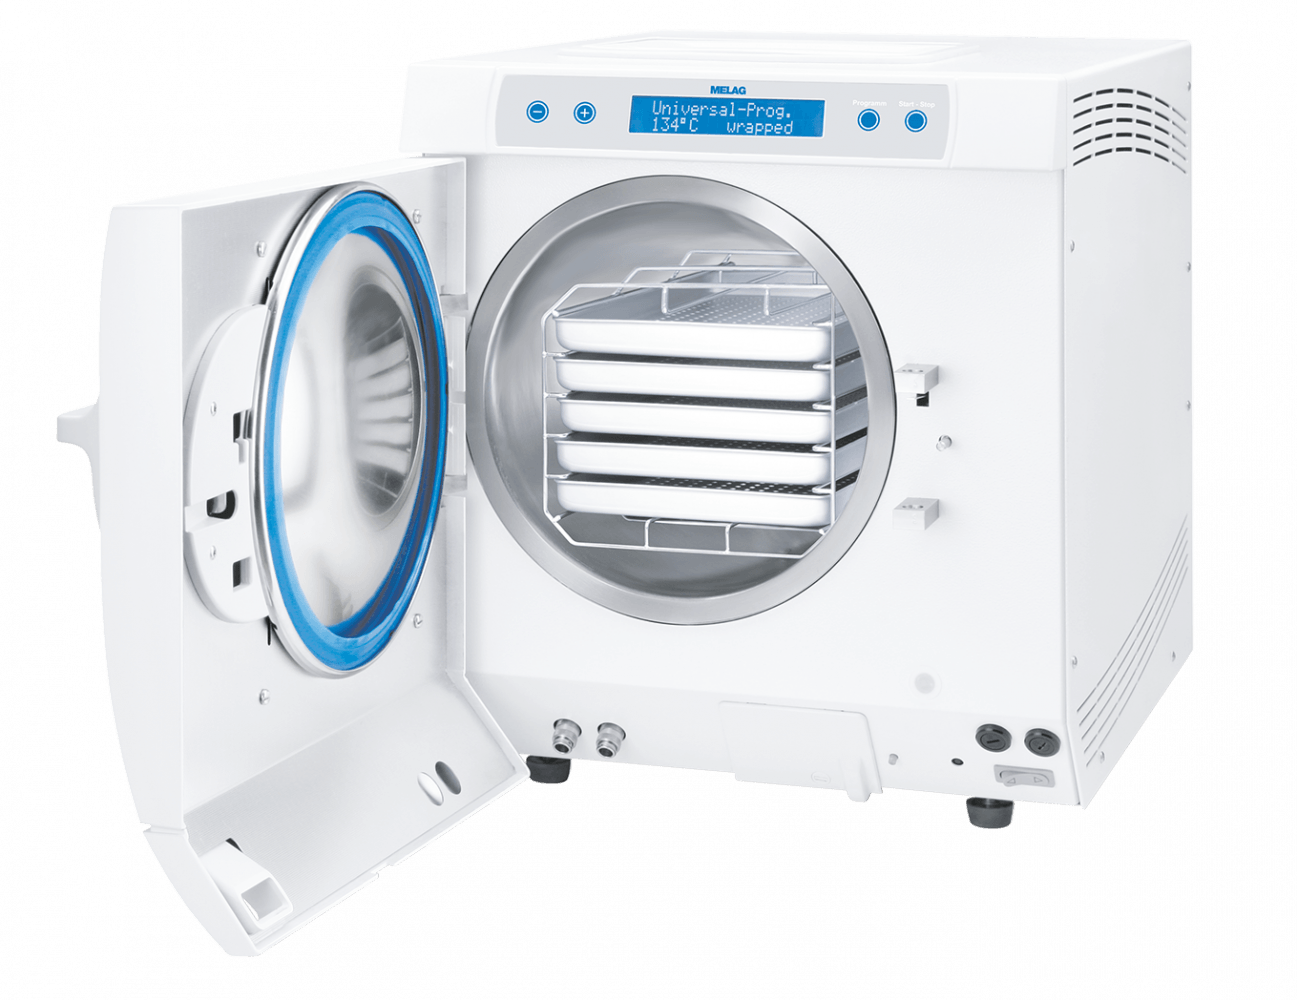
MELAG Vacuklav 31B+ Autoclave
Reliable steam sterilisers that work continuously
Read more Enquire nowReliable steam sterilisers that work continuously
Read more Enquire nowThese flexible products are not only distinguished by the patented air-cooling of the vacuum pump, but also by their reliability and ease of use. The innovative design of the Vacuklav 31 B+ simultaneously features fast operating times, along with versatility in recording and safety. The integrated monitoring of the feed water and the electronic control of the Vacuklav 31 B+ avoid operating faults and secure high quality sterilisation and maximum gentleness for your instruments.
Instruments of up to 5 kg in weight may be sterilized on 5 trays in the compact sterilization chamber (depth 35 cm, volume 17 litres). Two special, ergonomic water containers (for feed and waste water) are already integrated in the steam sterilizer as well as the important monitoring of the water quality.
How to perform a daily automatic control test (ACT)
Steam Sterilizer Product Highlights: Vacuklav 31 B+ and 23 B+ | MELAG
Recommissioning your decon room post COVID-19
Detailed below are a list of errors or warnings which may appear on your autoclave's display. Click on an error or warning to see the possible cause of the error or warning and what action should be taken.
Please note the following:
A warning is not an error
Not all messages which appear on the display are error messages.
Warning messages
Warning messages are displayed when necessary. Warning messages are not error messages. They help to ensure smooth operation and to recognise undesirable conditions. Observe these warning messages promptly in order to avoid errors.
Error message
Error messages are displayed if safe operation or sterilisation security is not guaranteed. These can appear on the display shortly after switching on the autoclave or while a programme is running. The programme is aborted if a malfunction occurs during a programme run.
If a programme is aborted before the drying cycle is complete, then the load is unsterile. Repackage and repeat the sterilisation for the respective items to be sterilised.
The error message is then shown on the display in alternation with the current programme phase (Pressure release, Ventilation or End) After the programme abort or termination, the error message is shown on the display in alternation with the message acknowledge with button ’-’and Stop/End. In order to delete the error message, press the KEY (-).
If you do not find the problem below or the action you take does not solve the problem, please contact our service team on 0800 028 4749. In order to help you, have the serial number of your autoclave and a detailed fault description of the fault report ready.
Possible Cause
Door switch is not closed on start.
Action
Push the sliding closure grip downwards until it stops.
Correct display: Door closed.
Possible Cause
Only if feed water supply from internal storage tank: Not enough feed water in the internal storage tank.
Action
Check feed water level in the internal storage tank and if necessary refill feed water.
Possible Cause
The warning message appears after programme start. The built-in flow monitor doesn’t close.
Action
Feed water supply from internal storage tank:
If the message appears repeatedly, have the unit checked by an engineer.
Feed water supply from MELAdem®40
Check water treatment unit, possibly open inflow to the unit.
If the message appears repeatedly, have the unit checked by an engineer.
Feed water-supply from MELdem®47
Check water treatment unit, possibly open inflow to the unit. When the pressure reservoir is empty about 1 hour after restart and the message is repeated, have the water treatment unit checked by an engineer.
 Notice
At the first start-up or re-start-up, this message can occur once since the piping system is still not completely filled: restart.
Possible Cause
Conductivity of the feed water too high.
Conductivity ≥ 40 μS.
Action
Still possible to start by repeatedly pressing the KEY (S): Feed water-supply off.
Possible Cause
Mixed-bed resin pellets consumed.
Action
MELAdem 40: Switch the mixed-bed resin pellets (Art. No. 61026), see Operating Manual for the water treatment unit MELAdem 40.
Possible Cause
Mixed-bed resin pellets in the after ion exchanger (3rd cartridge) consumed.
Action
MELAdem 47: Switch the mixed-bed resin pellets (Art. No. 37470), see Operating Manual for the water treatment unit MELAdem 47 and examine the unit.
On repeated occurrence, have maintenance carried out by our servicing team. Possibly the pre- and activated carbon filter must be exchanged in addition.
Possible Cause
Mixed-bed resin pellets in reverse osmosis facility consumed.
Action
For another water treatment unit:
Exchange module/ resin cartridge according to the operating manual of the manufacturer.
On repeated occurrence, carry out maintenance.
Notice
Initiate programme start after completion of the above-mentioned work. On the first start after maintenance of the water treatment unit, this warning text can appear once again since the inlet hose / measuring cell are still not completely flushed with fresh water.
Possible Cause
Conductivity of the feed water too high.
Conductivity ≥ 65 μS.
Action
Start no longer possible: See warning message: Feed water quality bad/ switch cartridge / module.
Possible Cause
Message is displayed during programme start phase. The autoclave has not reached the starting temperature yet.
Action
The autoclave starts automatically after reaching the starting temperature.
Possible Cause
Min. / Max. pressure on ventilation drying is too low / high.
Sterile filter polluted or torn.
Action
Exchange sterile filter.
Notice
Message comes at the end of the programme and in last row on logging printouts.
Possible Cause
The autoclave is operated without output medium although a output medium is registered.
Action
Select the option in the menu Batch output No output medium.
Possible Cause
Output medium is not correctly connected.
Action
Correct connection of the data cable to the autoclave and test at the output medium.
Possible Cause
Electric power supply of the printer is interrupted.
Action
Ensure electric power supply, the red LED “P” at the log printer MELAprint 42 must light red.
Possible Cause
Printer is offline.
Action
Set printer to “online” (press key “SEL” at the MELAprint 42, LED “SEL” must light green).
Possible Cause
The device-internal log memory is allocated (max. 40 logs possible).
Action
The message is shown at the start of a programme.
Repeatedly press the KEY (S) to delete the message and the programme starts. The oldest log is then deleted.
Possible Cause
An output medium is registered and in the menu Batch output the option Immediate output No is set.
Action
Set autoclave to 33, Automatic immediate Output Yes (see page 33, Automatic Immediate Log Output, in the Vacuklav 31B+ User Manual).
Delete protocol memory (see page 34, Printed all saved logs, in the Vacuklav 31B+ User Manual).
Log off the output medium in the menu batch output / output medium and set the option no output medium.
Possible Cause
The maintenance message is activated, the device has reached the prescribed batch number,
Action
The message is shown at the start of a programme.
Repeatedly press the KEY (S) to delete the message and the programme starts. Retain the message: press the (S) key twice to start. Call our service team on 0800 028 4749.
Possible Cause
The leakage rate determined by the vacuum test lies above the maximum permissible value of 1.3 mbar.
Door seal, chamber flange is contaminated.
Action
Check door seal and chamber flange for cleanliness, possible clean.
Check door seal for damage, possible exchange (see page 11 of the Vacuklav 31B+ User Manual).
Repeat vacuum test with completely cold device.
Possible Cause
Door seal wrongly inserted.
Action
Check door seal for correct seating.
Repeat vacuum test with completely cold device.
Possible Cause
The monitoring of the device’s internal battery voltage has determined a too low voltage value.
Action
The battery must be exchanged by one our engineers.
Possible Cause
After switching on the autoclave the display remains empty.
Action
Check whether the power plug is correctly in the socket.
Check the supply voltage at the socket.
If necessary, switch the device fuses at the lower front of the autoclave off.
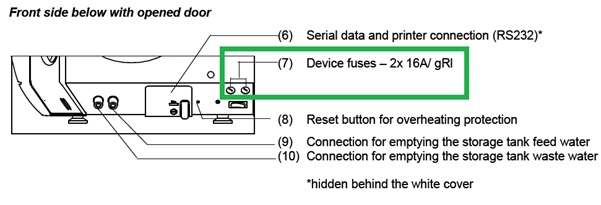
Follow instructions in the technical manual in Exchange Device Fuses.
Possible Cause
The feed water consumption is dependent upon the programme and the loading of the autoclave.
Action
Check the correct set up of the autoclave.
The floor of the vessel must be free. Where applicable, remove fallen instruments, filter paper, etc.
Possible Cause
Apart from a proper device function, the drying process depends on the correct setting up and loading of the autoclave.
Action
Once a day.
Once a day.
Once per week on a cold, empty chamber.
Yes, no residual water must be left in the unit overnight.
Hollow, solid and air retentive instruments can be put through on this cycle.
Yes, this requires the purchase of a double chamber syphon and can be fitted by a Henry Schein Dental engineer.
This is down to the practice requirements, but typically many practices will download once per week.
Consult the manufacturer of your autoclave as they will inform you if this is required. HTM 01-05 states that this should still be completed. If you obtain no advice from the manufacturer then follow the HTM 01-05 guidance.
Malfunctions can occur on continuation of operation despite the servicing message
For retention of value and functional reliability
Regular maintenance is very important for the retention of value and the reliable operation of the autoclave. During maintenance, all functional and safety-relevant components and electrical facilities are checked and replaced if necessary. The maintenance is carried out according to the maintenance instructions relevant for this autoclave.
Maintenance intervals
Regularly allow for maintenance after each 1000 programme cycles or two years.
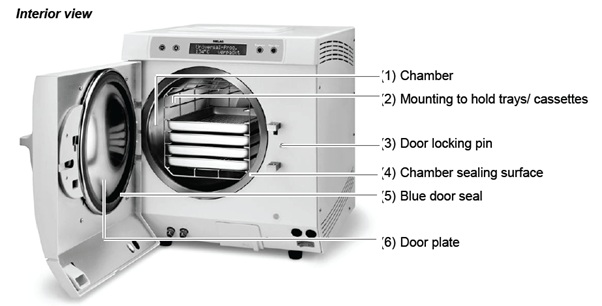
Examine the chamber including the door seal, chamber sealing surface and the mounting for loading (see page 20, Load the autoclave, in the Vacuklav 31B+ User Manual for further information) once a week for contaminants, deposits or damage.
If you find any contaminations, draw the existing trays or cassettes and the associated mounting forwards out of the chamber. Clean the contaminated parts.
Door Seal
The door seal must not be greased or oiled. It should be kept clean and dry.
When cleaning the chamber, the loading mounting, the chamber sealing surface and the door seal observe the following:
In case of non-observance the cleaned surface could become scratched or damaged and the sealing surfaces not tight. This would promote dirt deposits and corrosion in the sterilisation chamber.
Housing parts
Clean the housing parts with neutral liquid cleaners or methylated alcohol.
Internal storage tank for feed water
If you provide the feed water supply manually via the internal storage tank, check for soiling when you refill the feed water. If necessary, clean the tank with a cloth and fresh feed water before refilling.
Be sure to wipe up and remove any soiling or impurities from the tank with a cloth without leaving any residues. If dirt particles are only detached but not actually removed, they can get into the dirt particle filter integrated into the drain hose while emptying the waste water tank.
Non-observance could impair the service life of the dirt particle filter and make it necessary to exchange the filter at short notice.
Clean the left side of the water storage tank (waste water) every two weeks.
Both chambers are emptied as follows:
To remove the drain hose again, press the grey release button at the quick fitting connection. The hose detaches itself automatically from the connection.
Please observe the following when removing the quick-fitting connection:
Repeat the procedure for the other chamber if necessary
Formation of spots due to improperly cleaned instruments
Only if you correctly clean the instruments before sterilisation can you avoid the detachment of residues resulting from loading or instrument preparation under steam pressure during the sterilisation. Detached dirt residues (e.g. residues of disinfectants) can clog the filter, nozzles and valves of the autoclave and deposit as stains, spots or discolourations on the instruments and in the chamber (see page 19, Prepare items to be sterilised, in the Vacuklav 31B+ User Manual).
Formation of spots due to third-party rust
All steam-conducting parts of the autoclave are made of non-rusting materials. This excludes the formation of rust caused by the autoclave. Should rust stains occur, then you are dealing with third-party rust. If the instruments have been incorrectly prepared, rust can form even on stainless steel instruments of leading manufacturers. Often a single rust-producing instrument suffices for third-party rust to form on the other instruments or in the autoclave. Remove third-party rust from the instruments with a chlorine-free stainless steel cleaning agent or send the damaged instruments to the manufacturer for reconditioning.
Formation of spots due to inadequate quality of the feed water
The extent of the formation of spots on the instruments also depends on the quality of the feed water used for steam production.
Use qualitatively high-grade feed water
Observe the following when using feed water for steam sterilisation:
In case of non-observance, stains or damage on the instruments can arise and the functional readiness of the autoclave can be adversely affected.
Water according to VDE 0510
Distilled or demineralised water must have the VDE 0510 noted on the label of the packaging.
Feed water which you can inexpensively produce with the osmosis processes with MELAdem®40 or with the ions exchanger MELAdem®47 or by distillation with MELAdest®65, satisfies the requirements on the feed water.
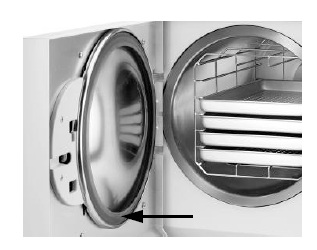
If the door seal shrinks or is wavy, it is necessary to exchange the door seal.
The consequence can be poorly sealed areas which can lead to the leakage of steam or cause a too high leakage rate in the vacuum test.
Open the door of the autoclave and take the old door seal out. The door seal is only inserted in the groove of the door plate (as per image).
Set the new door seal in the groove in such a way, that the wider sealing surface shows toward the chamber side.
Observe without fail the different widths of the sealing surface. Only with correct seating in the groove is a proper closing of the door guaranteed and the chamber tight.
We know an unexpected breakdown in your practice can be a massive headache for you and your patients - which is why we have a dedicated team of 50 people ready to provide you with a range of comprehensive cover options for your practice equipment, giving you complete peace of mind and minimising the cost of an unexpected breakdown. You can depend on us.
With Protection Cover, you get free access to our team of 10 high tech digital support specialists who can help with digital imaging, lasers and CAD/CAM. For the simpler problems, we also have technicians, who are dedicated to helping you over the phone. You can also at a small cost, use their services even if you don't have cover.
Invest in your practice - choose our comprehensive protection cover. For 12 months we will cover the items you want. It includes an annual service, emergency breakdown, labour and access to our high tech digital support specialists.
To get optimum performance from your equipment and to conform to manufacturer’s recommendations, an annual service could be just what you’re looking for. It’s carried out by our accredited team and includes a 3 month warranty on the work.
We are never far away in an emergency. Unplanned breakdowns are a headache for any surgery. We are more than happy to help.
Our equipment team will use the information you provide to respond to your query as promptly as possible.
You could ask about a FREE one-to-one consultation with one of our specialist team, quotation, demonstration of the latest equipment, or any other question you may have in helping you make an informed decision.