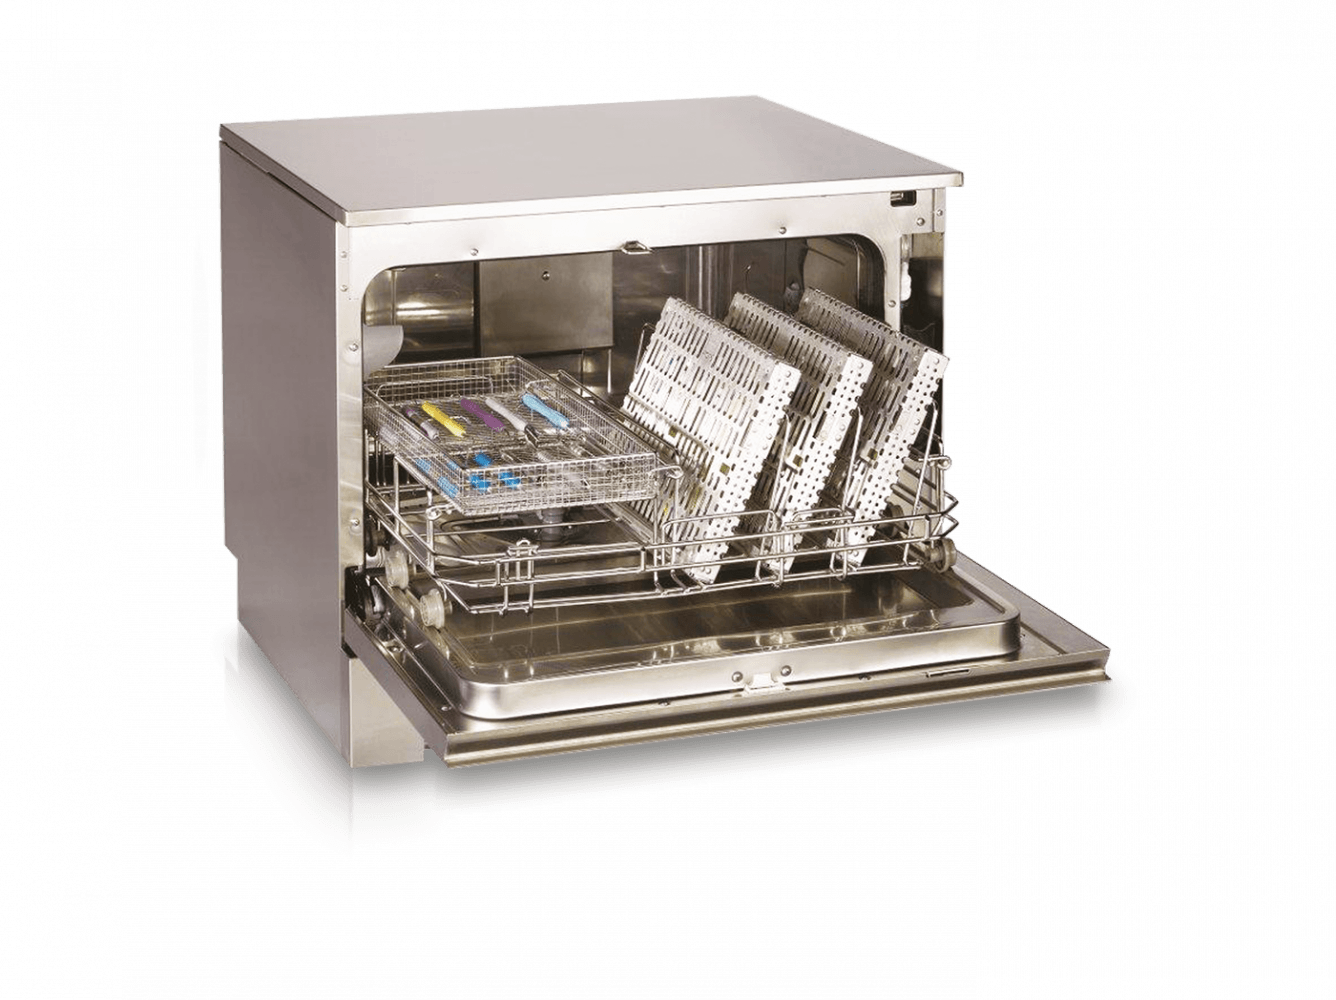
SciCan HYDRIM C61wd G4 Washer Disinfector
Automated Instrument Washing the first step in the sterilisation process
Read more Enquire nowAutomated Instrument Washing the first step in the sterilisation process
Read more Enquire nowHYDRIM C61W/WD G4 ensures instruments are properly and consistently cleaned before moving to the next step of instrument reprocessing, sterilisation.
HYDRIM C61W G4 has a 6 full-size cassette capacity and can turnover 120 instruments in 40 mins, start-to-dry.
Can be mounted under the counter or as a counter top.
HIPTM ULTRA cleaning solution is stored in the unit, no extra storage space required.
Automated washing saves 1 hour of labour (manual cleaning) for every nine procedural set-ups.
Safe
Avoid the many steps involved with manual cleaning or using ultrasonic cleaners such as pre-soaking, scrubbing and drying instruments.
HYDRIM G4 ensures that every set of instruments receive the same validated cleaning process by dosing the correct amount of detergent with each cycle.
Validated cycles to ensure repeatable washing performance.
Active drying system allows instruments to immediately be transferred to the next step of instrument reprocessing, sterilizsation.
G4 Technology - Information at your fingertips
Designed as a self-monitoring unit, WiFi enabled G4 technology can connect and send cycle data to your smart devices or computer, providing easily accessible cycle information and service logs.
G4 technology connects your HYDRIM to specialised technicians, which allows for remote support and minimises unnecessary downtime.
Large touch screen gives in-depth cycle info and allows users to view current operation.
How to perform a weekly protein residue test
Recommissioning your decon room post COVID-19
Detailed below is a list of errors which may occur. Click on an error to see the possible cause and what action should be taken.
If you do not find the error below or the action you take does not solve the problem, please contact our support team on 08700 10 20 46. In order to help you, have the serial number of your autoclave and a detailed description of the fault report ready.
Possible Cause
Overloaded cassettes or instrument baskets.
Too many cassettes loaded into the unit.
Action
Use the heavy duty cycle for cassettes and hinged instruments.
 Check filters and wash arms for debris.
Increase wash times.
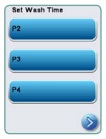
The wash times for P3 and P4 can be set independently. Touch the cycle for which you want to set the wash time. Use the up and down arrows to select the desired wash time. Touch “default” if you wish to return to the factory default. Use the back arrow to return to the previous screen.
Action
Ensure that the power button is turned ON.
Ensure that the plug is properly inserted into the wall socket.
Check if a fuse or circuit is blown – call our service team on 0800 028 4749 for assistance.
Fuses should not be replaced by the operator. Call our service team on 0800 028 4749. For continued protection against the risk of fire, replace only with 15A, 250V type F fuses.
Action
Remove the wash arms, clean and reinstall them.
Check for obstructions in chamber.
Possible Cause
The cycle is not complete.
The cycle was aborted and the unit has not completed draining yet.
Action
Allow the cycle to complete.
Possible Cause
The water is not hot enough.
Action
Check that the incoming hot water temperature is in the recommended range.
Check that the hot and cold hoses are not reversed.
Action
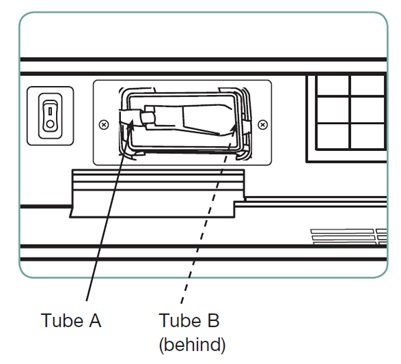
Check for a kink in chemical tubing.
Check cap for seal.
Reinstall chemical solution by following the steps below:
Replacing the HIP™ Ultra cleaning solution
Only replace the cleaning solution with HIP™ Ultra cleaning solution, which is used in dilute form as a detergent for the cleaning of surgical instruments in the HYDRIM washer-disinfector.
It is a colourless and almost odourless liquid that is completely soluble in water. Some precautions must be taken to safely handle this chemical. For more information, see section 3.2 Handling and Installing the HIP™ Ultra cleaning solution of the Hydrim C61 Washer User Manual.
To avoid spillage, replace the solution container only when the message appears and be sure to wear gloves.
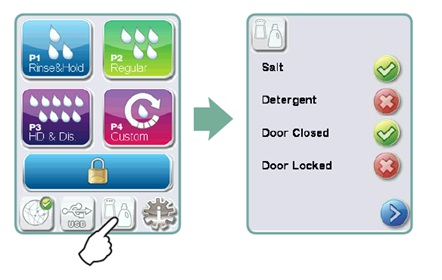
When a red X appears on the water softener/detergent icon
Press on the icon to determine if the problem is with the water softener or cleaning solution level. If the cleaning solution must be replaced, a red X will appear next to it.
To replace the cleaning solution, follow these steps:
 |
 |
 |
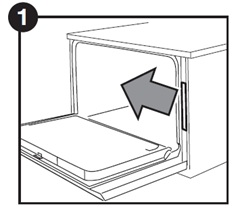
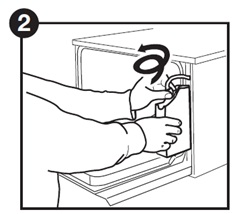
| Turn the power OFF, open the door and pull out the chemical drawer. | Disconnect the cleaning solution connector. | Remove the empty cleaning solution bag and discard or recycle it. |
 |
 |
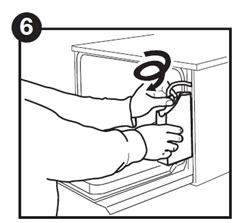 |
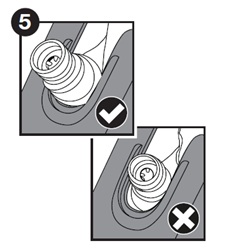
| Place a new bag in the chemical drawer. | Ensure the nozzle is in the correct position. | Connect the new bag, close the door and power ON the unit. |
To prime the cleaning solution dosing pump, press the water softener/detergent icon on the main screen. In the water softener/detergent screen, press the red X next to “Detergent”. The unit will prime the dosing system and a green check mark will appear in place of the red X when it is ready for use.
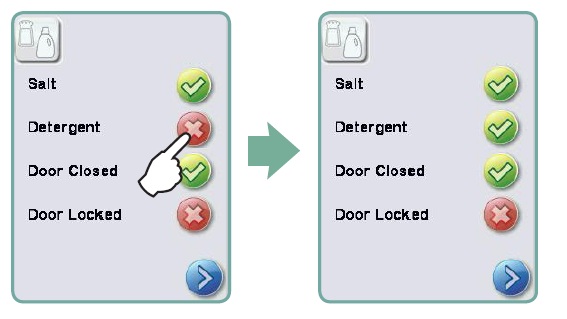
The system can also be primed by simply starting a cycle and selecting “Detergent Replaced” when prompted.
Action
 Increase the drying time.
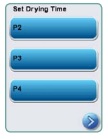
The drying times for P2, P3 and P4 can be set independently. Touch the cycle for which you want to set the drying time. Use the up and down arrows to select the desired drying time. Touch “default” if you wish to return to the factory default. Use the back arrow to return to the previous screen.
Change the HEPA filter by following the steps below:
To reset the drying counter:

The filter must be replaced every 750 drying cycles. The unit will continue to run if the filter is not replaced, but you will notice less than optimal drying performance.
Action
The annual maintenance should be carried out after 365 days have elapsed since the initial installation or the last service call. Call our service team on 0800 028 4749 to book an appointment.
Action
Replace HEPA Air Filter by following the steps below:
To reset the drying counter:
The filter must be replaced every 750 drying cycles. The unit will continue to run if the filter is not replaced, but you will notice less than optimal drying performance.
Action
Replace Biological Filter by following the steps below:
If filter has been replaced and the message continues to appear, reset LCS counter.
To reset the LCS counter:

Action
Check HEPA filter to ensure it is installed correctly (with arrow in correct position).
Action
If you need to copy all of the unit’s cycle data to a new USB storage device:
Action
Select the connectivity icon to go to the connection status screen.
HTM states that this must be done on a weekly basis, however always consult the manufacturer as they may request different requirements. In regards to the Scican C61 this should be done monthly.
HTM states that this must be done on a quarterly basis, however always consult the manufacturer as they may request different requirements. In regards to the Scican C61 this should be done monthly.
In respect of the Scican C61 the HIP solution should last approximately 18 cycles, depending on water quality. Your unit will inform you when these need changing.
This will be down to your individual needs. Your data logger will hold more than 7 year’s worth of data so a constant back up is achieved. It is good practice to try and download the data on a weekly basis so that the practice has a back up on a central PC for inspection purposes.
Only replace the cleaning solution with HIP™ Ultra cleaning solution, which is used in dilute form as a detergent for the cleaning of surgical instruments in the HYDRIM washer-disinfector.
It is a colourless and almost odourless liquid that is completely soluble in water. Some precautions must be taken to safely handle this chemical. For more information, see section 3.2 Handling and Installing the HIP™ Ultra cleaning solution of the Hydrim C61 Washer User Manual.
To avoid spillage, replace the solution container only when the message appears and be sure to wear gloves.
When a red X appears on the water softener/detergent icon
Press on the icon to determine if the problem is with the water softener or cleaning solution level. If the cleaning solution must be replaced, a red X will appear next to it.
To replace the cleaning solution, follow these steps:
|
|
|
| Turn the power OFF, open the door and pull out the chemical drawer. | Disconnect the cleaning solution connector. | Remove the empty cleaning solution bag and discard or recycle it. |
|
|
|
| Place a new bag in the chemical drawer. | Ensure the nozzle is in the correct position. | Connect the new bag, close the door and power ON the unit. |
To prime the cleaning solution dosing pump, press the water softener/detergent icon on the main screen. In the water softener/detergent screen, press the red X next to “Detergent”. The unit will prime the dosing system and a green check mark will appear in place of the red X when it is ready for use.
The system can also be primed by simply starting a cycle and selecting “Detergent Replaced” when prompted.
When a red X appears on the detergent and water softener level indicator, press on the icon to determine if the problem lies with the water softener or cleaning solution level. If the water softener must be refilled, follow these steps:
Air filter
When the message “Replace air filter” appears, the HEPA filter is in need of changing.
To reset the drying counter:
The filter must be replaced every 750 drying cycles. The unit will continue to run if the filter is not replaced, but you will notice less than optimal drying performance.
Bacteriological filter
Models fitted with a lumens cleaning system (LCS) have a biological filter that must be replaced every 500 cycles or if dirty. To change the biological filter, follow these steps:
Filter maintenance
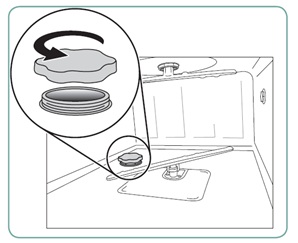
Inspect the coarse and fine filters in the bottom of the chamber daily for debris and clean if necessary. To clean, remove the filter (turn the metal nut at the centre front of the filter to release it), rinse under a tap and reassemble. Ensure that the filter is firmly locked into position when replaced.
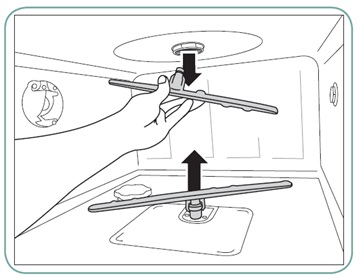
Wash arm maintenance
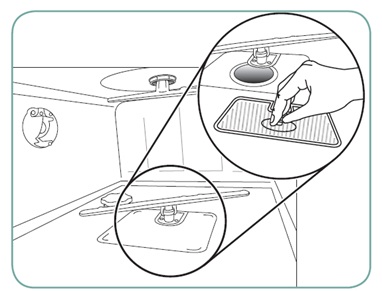
If you see that the wash arms are not turning easily, remove the arm(s) as needed – excessive removal of wash arms can reduce service life. Both the upper and lower arms are pressure mounted. To remove the upper arm, pull down and to remove the lower arm, pull up. Rinse under a tap, clear obstructions from outlet holes and reassemble.
To clean outer surfaces and the decal covering the touchscreen, use a soft cloth moistened with soap and water or a surface disinfectant. Do not use harsh cleaning chemicals. To clean the chamber, use the “Cleaning” function available in the user menu with 0.5 L of vinegar or citric acid in the chamber.
Every 25 cycles, the user will be reminded to run a chamber cleaning cycle. Press OK to continue the selected wash cycle but remember to run a chamber cleaning cycle at the next available opportunity.
If preparing the unit for transport or storage, waste water should be removed from the sump. Waste water in the unit may contain biological contaminants.
If the message “Preventative Maintenance Required. Call for Service” appears, the annual maintenance is required. To continue using the HYDRIM, press OK. Call our servicing team on 0800 028 4749 as soon as possible. The annual maintenance should be done after 365 days have elapsed since the initial installation or since the last service call was performed.
The following outlines the recommended regular maintenance to be performed by the user and technicians for the HYDRIM C61wd G4 washer-disinfector.
To ensure the unit's ongoing cleaning efficacy, SciCan recommends observing the following periodic testing protocols.
This outlines the minimum requirements to ensure that the equipment performs to specification. In some regions, local/national guidance documents may require additional testing. Please contact our Decontamination Specialists or your local authority for details.
Installation, commissioning, annual servicing must be undertaken by one of our technicians. Failure to maintain this equipment may invalidate the results of the following testing regime.
The recommended periodic testing protocols are listed in the table below:
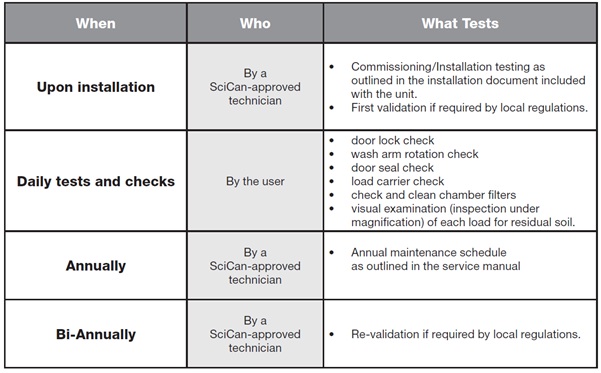
Tests to be performed by the user:
Door lock check
This test is to ensure that the door cannot be opened while a cycle is running or a cycle will not start with the door open. To check that these features are working correctly, attempt to open the door using the handle immediately after a cycle has started.
Caution – DO NOT attempt this when the wash arms are rotating and/or the water is above ambient temperature.
The door should not open. When you attempt to start a cycle with the door open, the cycle should not start. If the unit fails this test, stop using it immediately and call our service team on 0800 028 4749.
Door seal check
Visually check the door seal for debris or wear. If the seal is worn or damaged, call our service team on 0800 028 4749.
Load carrier check
Visually check load carriers (trolleys) for wear and tear, damage and that the runners move freely over their full range.
Chamber filter check
Remove, visually check and clean as described above.
Load check
Visually inspect each load for residual soil. Washers are designed to ensure that the surfaces of instruments are free from debris that may compromise the sterilisation process. A visual check of the instruments processed in each load should be undertaken prior to sterilisation to ensure that no residual debris is present on the instrument.
If debris is still apparent, the instrument should not be considered clean and should be reprocessed through the HYDRIM again prior to sterilisation.
Some setable materials such as cements and composites, if set on the instrument will not be removed in a HYDRIM. If these materials are noticed on the instrument then abrasive removal may be required.
We know an unexpected breakdown in your practice can be a massive headache for you and your patients - which is why we have a dedicated team of 50 people ready to provide you with a range of comprehensive cover options for your practice equipment, giving you complete peace of mind and minimising the cost of an unexpected breakdown. You can depend on us.
With Protection Cover, you get free access to our team of 10 high tech digital support specialists who can help with digital imaging, lasers and CAD/CAM. For the simpler problems, we also have technicians, who are dedicated to helping you over the phone. You can also at a small cost, use their services even if you don't have cover.
Invest in your practice - choose our comprehensive protection cover. For 12 months we will cover the items you want. It includes an annual service, emergency breakdown, labour and access to our high tech digital support specialists.
To get optimum performance from your equipment and to conform to manufacturer’s recommendations, an annual service could be just what you’re looking for. It’s carried out by our accredited team and includes a 3 month warranty on the work.
We are never far away in an emergency. Unplanned breakdowns are a headache for any surgery. We are more than happy to help.
Our equipment team will use the information you provide to respond to your query as promptly as possible.
You could ask about a FREE one-to-one consultation with one of our specialist team, quotation, demonstration of the latest equipment, or any other question you may have in helping you make an informed decision.